
Adding a Robotic Wall Light Switch Cover to Your Apple Home
Issue #59

The Problem:
You are using the Apple Home app with several smart plugs and bulbs. Still, you wish there were a no-wiring method of installing a smart switch to control overhead lighting without calling an electrician or attempting to do it yourself. This can be important if you are in a rental.
The Solution
Third Reality offers a Smart Switch MT1 Matter Over Thread device and also a Smart Switch Starter Kit with Bridge that can be controlled by your existing Apple Home devices, such as an Apple TV or an HomePod can install this switch cover without wiring in a new switch, as it connects to your existing switch plate.
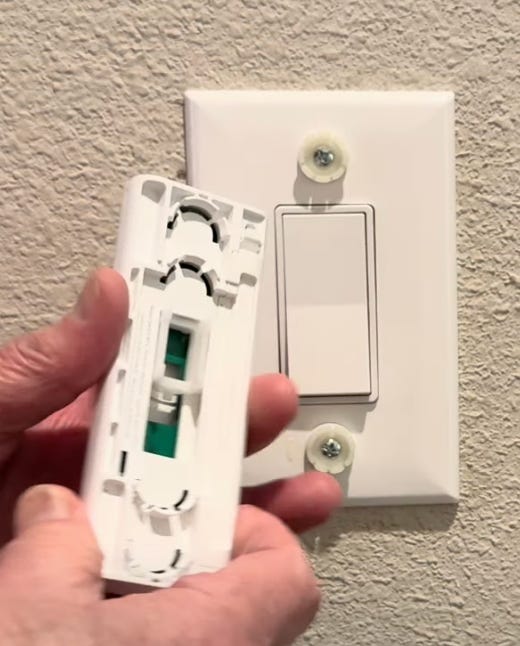
If you can change a switch plate, just two screws, you can add this robotic switch cover by adding mounting fasteners to the existing switch plate.
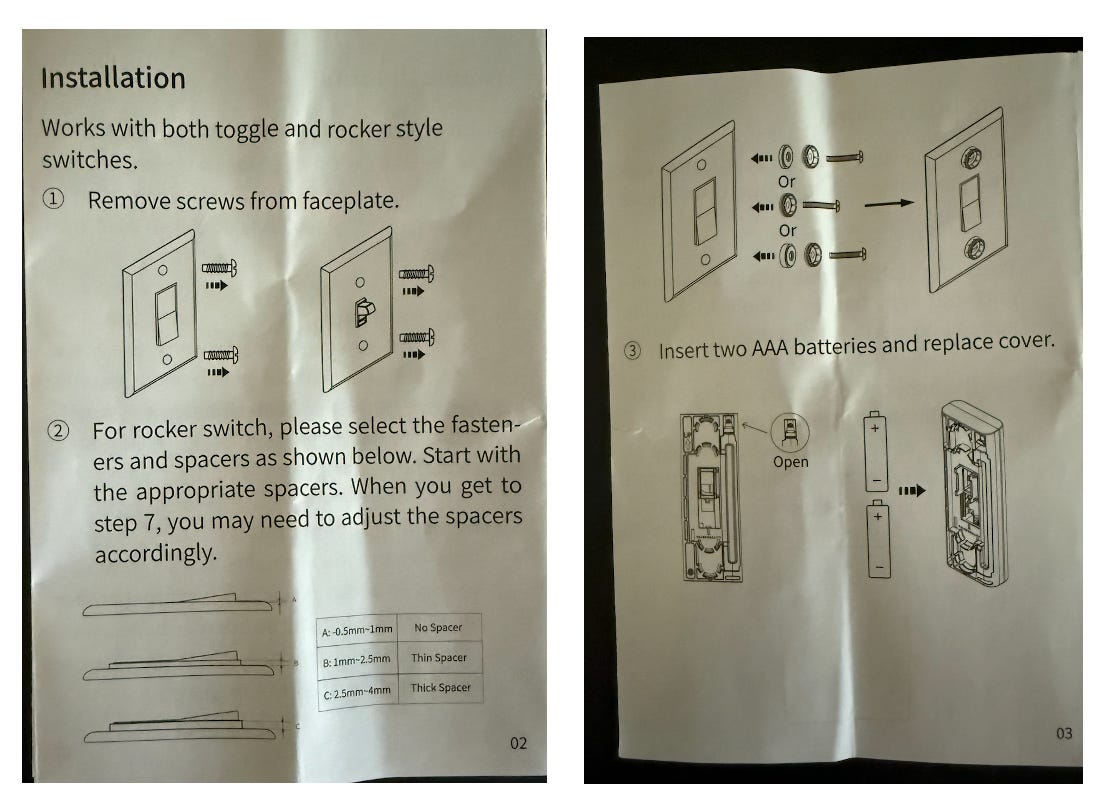
Note: After mounting, push the button to check to see if it can turn the light switch on/off. I needed to add a thin spacer to make the switch work.
Here is a YouTube video of the installation and usage.
How do I connect it to my Apple Home?
If you haven’t set up your Apple TV as a Home Hub, follow these steps:
1. Sign in to iCloud on your Apple TV
• Go to Settings > Users and Accounts > [Your Name]
• Make sure you’re signed in with the same Apple ID used on your iPhone/iPad
2. Enable Two-Factor Authentication on your iPhone/iPad:
• Settings > [Your Name] > Sign-In & Security > Two-Factor Authentication
§ This must be enabled for Home Hub functionality
3. Enable iCloud Keychain on iPhone/iPad
• Settings > [Your Name] > iCloud > Passwords and Keychain > iCloud Keychain > ON
4. Enable Apple TV as Home Hub on Apple TV:
· Settings > AirPlay and HomeKit > Room
· Assign the Apple TV to a room (e.g., Living Room)
5. Verify Apple TV is Working as a Home Hub on iPhone/iPad:
· Home app > … (More button) > Home Settings > Home Hubs & Bridges
You should see your Apple TV listed as “Connected”
Setup of the Smart Switch Cover:
The method of connecting the smart switch differs based on the model of your Apple TV or HomePod
Here is a list of Apple TV & HomePods that have a Thread Border router
· Apple TV 4K (2nd generation, model A2169) – Launched in 2021
· Apple TV 4K (3rd generation, model A2843) – Launched in 2022
· HomePod mini (model A2374)- Launched in 2020
· HomePod (2nd generation A2825)- Launched in 2023
Here is a List of Apple TV & HomePods that do NOT have a Thread Boarder Router and require a Matter Bridge
· Apple TV HD (4th generation, model A1625) – Launched in 2015
· Apple TV 4K (1st generation, model A1842) – Launched in 2017
· Apple TV 4K (3rd generation, models A2737 – Launched in 2022
· HomePod (1st generation Model Number: A1639) Launched February 2018
Check the model number and choose the setup method below:
Note: Using an Apple TV or HomePod with Thread, as shown in method 1 below, is MUCH easier than adding Matter bridge as shown in method 2. You may consider buying a later-generation Apple TV or adding a HomePod mini.
Set up method 1- using Apple TV/HomePod with Thread
· Insert the batteries and press the button on the smart switch for about 20 seconds until the LED in the light flashes rapidly.
o This happens about 15 seconds AFTER the solid blue light
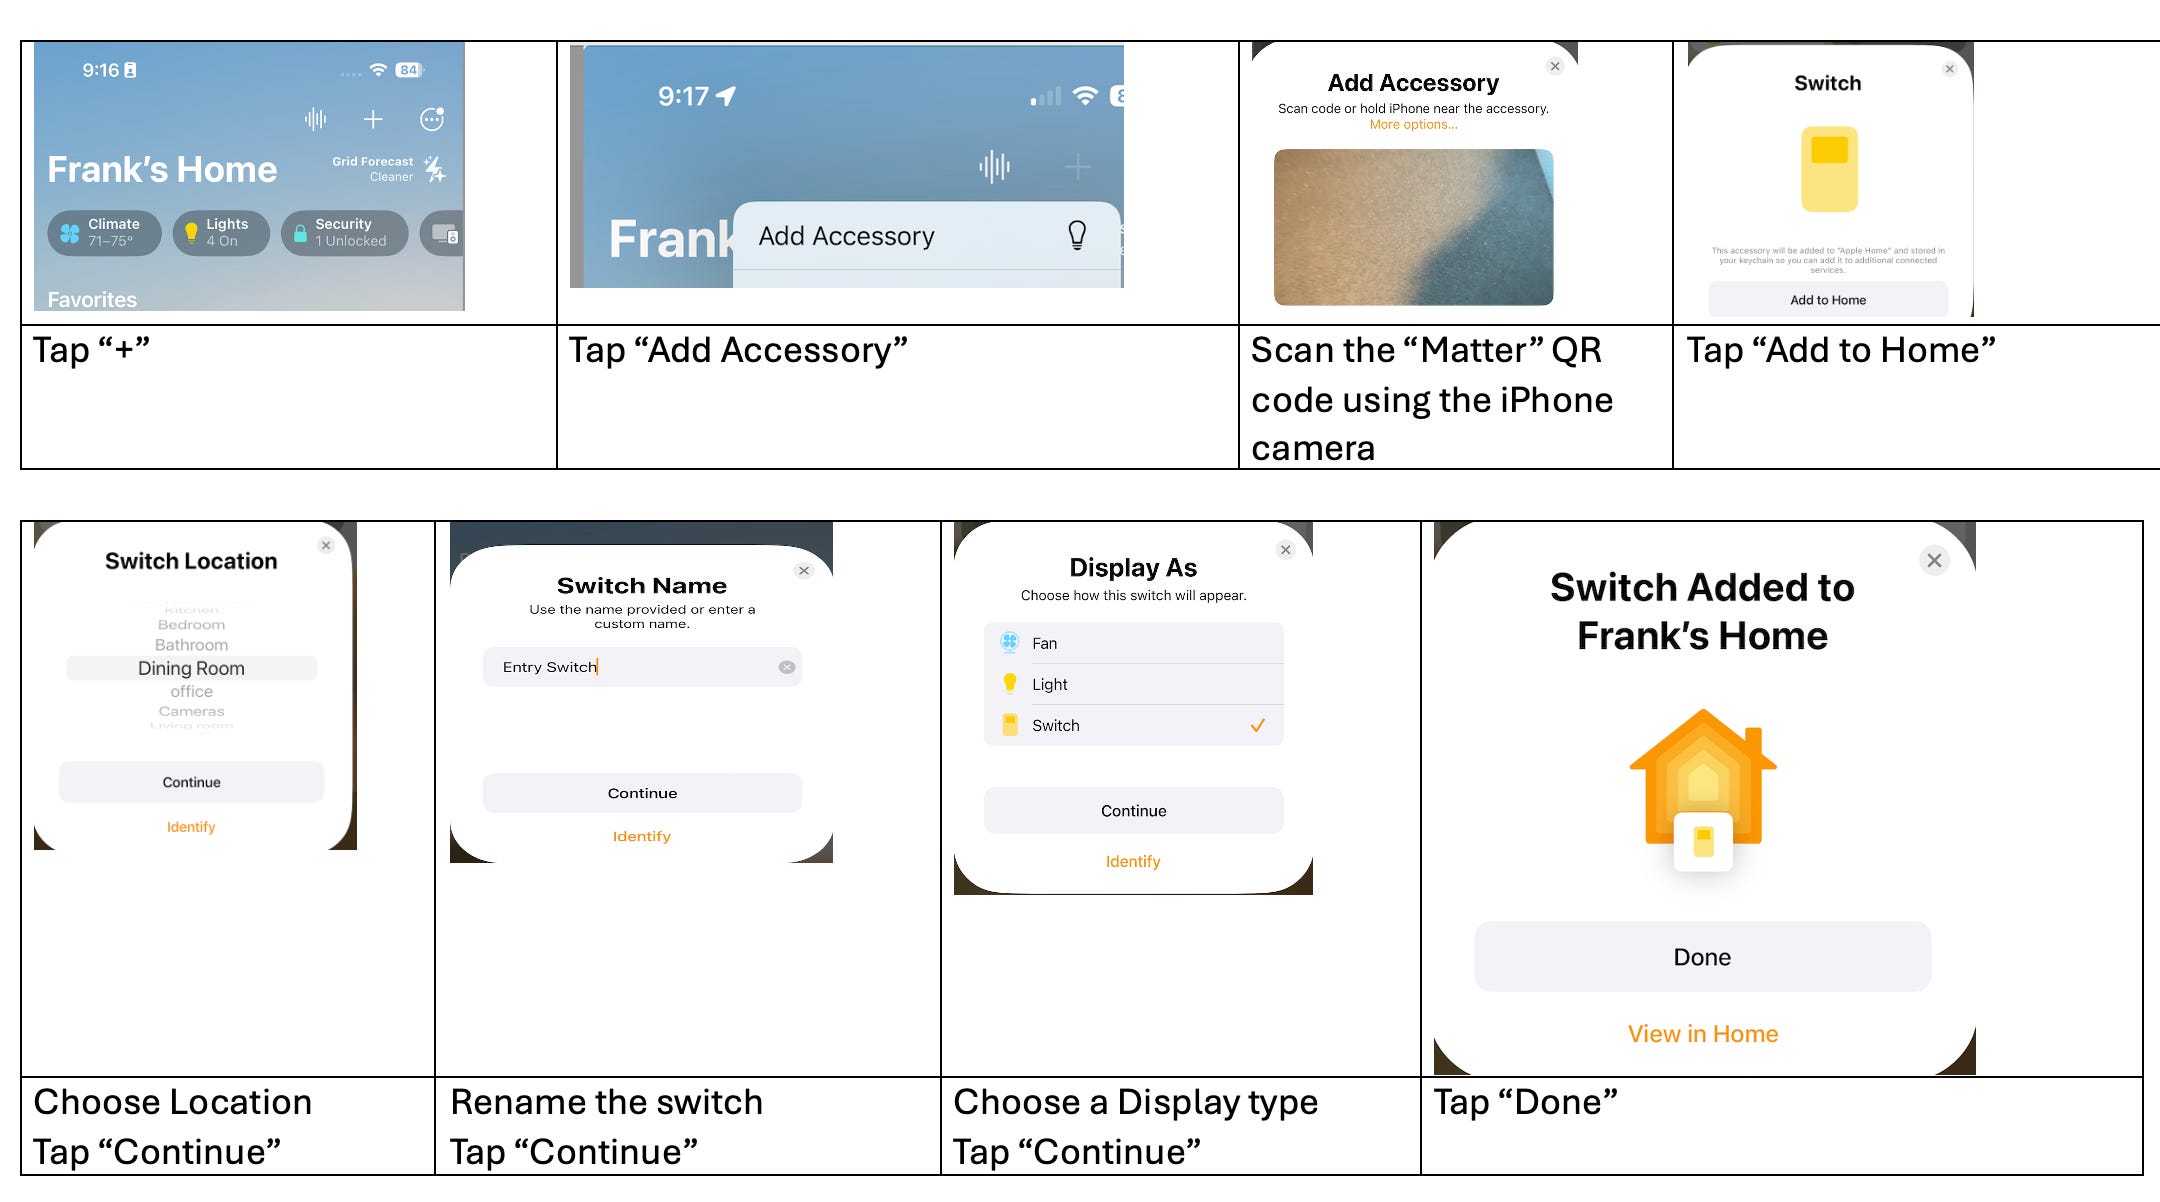
· Follow these steps in the Apple Home app
You can now jump to the “Testing” section below.
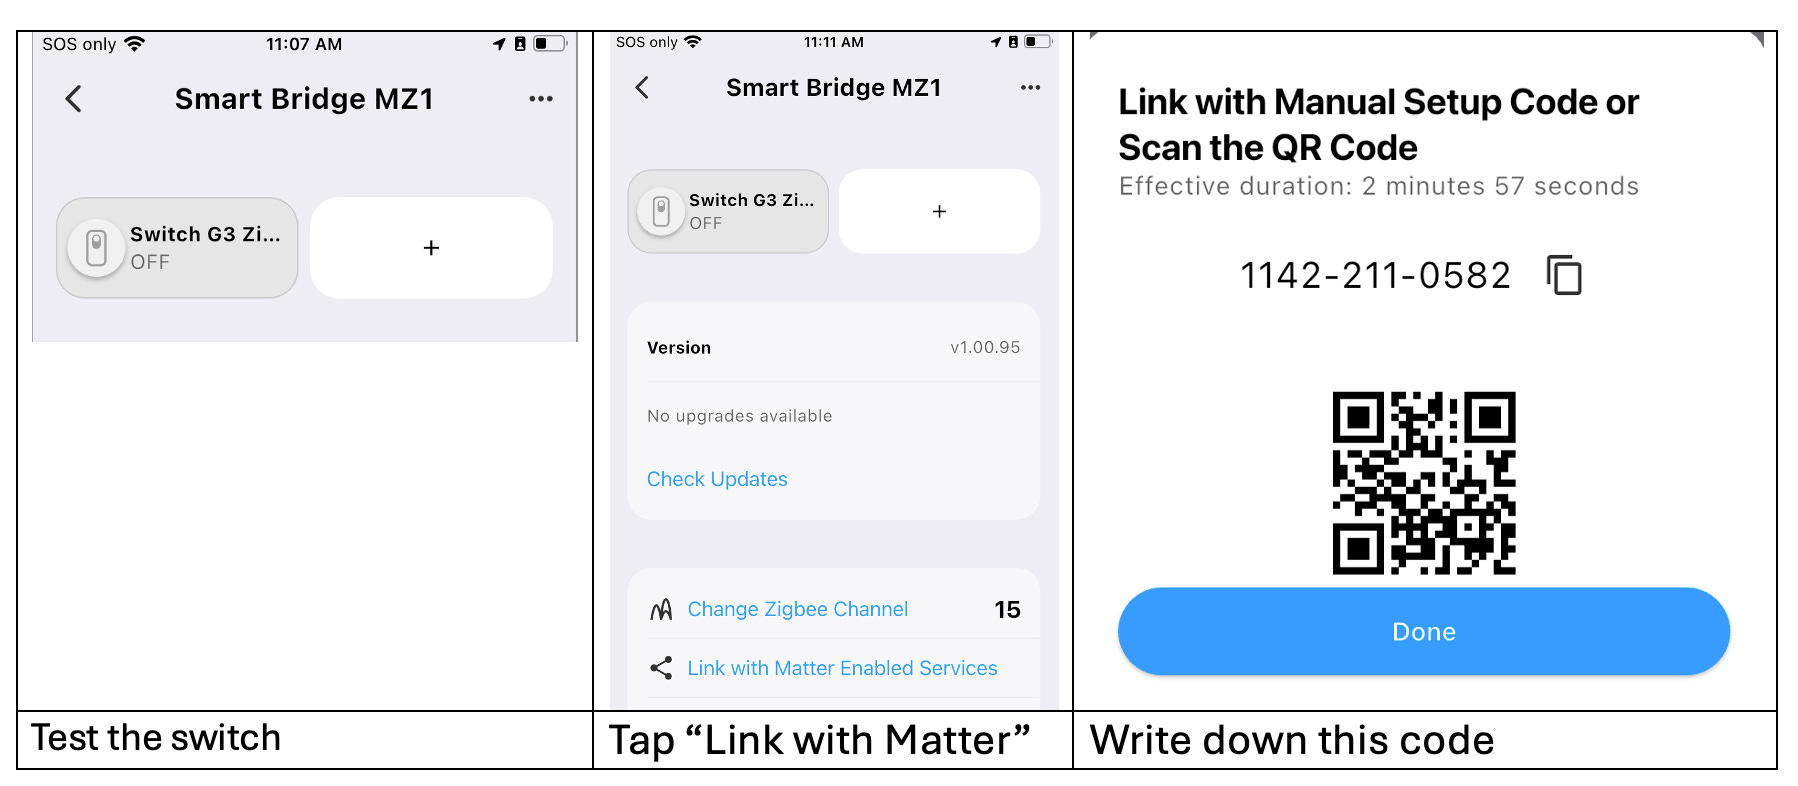
Note: Since the Matter Code sticker is NOT attached to the switch, you will need to retain it, or a picture of it, as it will be REQUIRED if you delete the switch from HomeKit or the 3R-Installed app and then attempt to reconnect it. If you have several of these switches, please be aware that this is a unique ID for each switch.
Some readers store the Matter setup codes in Apple Notes or use apps such as Controller or HomePass to manage the setup codes
Set up method 2- using Apple TV/HomePod without Thread
This method is more difficult as it adds an additional device serving as a bridge between the smart switch and the Apple Home app. You may want to consider buying a later Apple TV or adding a HomePod mini
· Install the Third Reality “3R- Installer” app on your iPhone/iPad
· Create an account
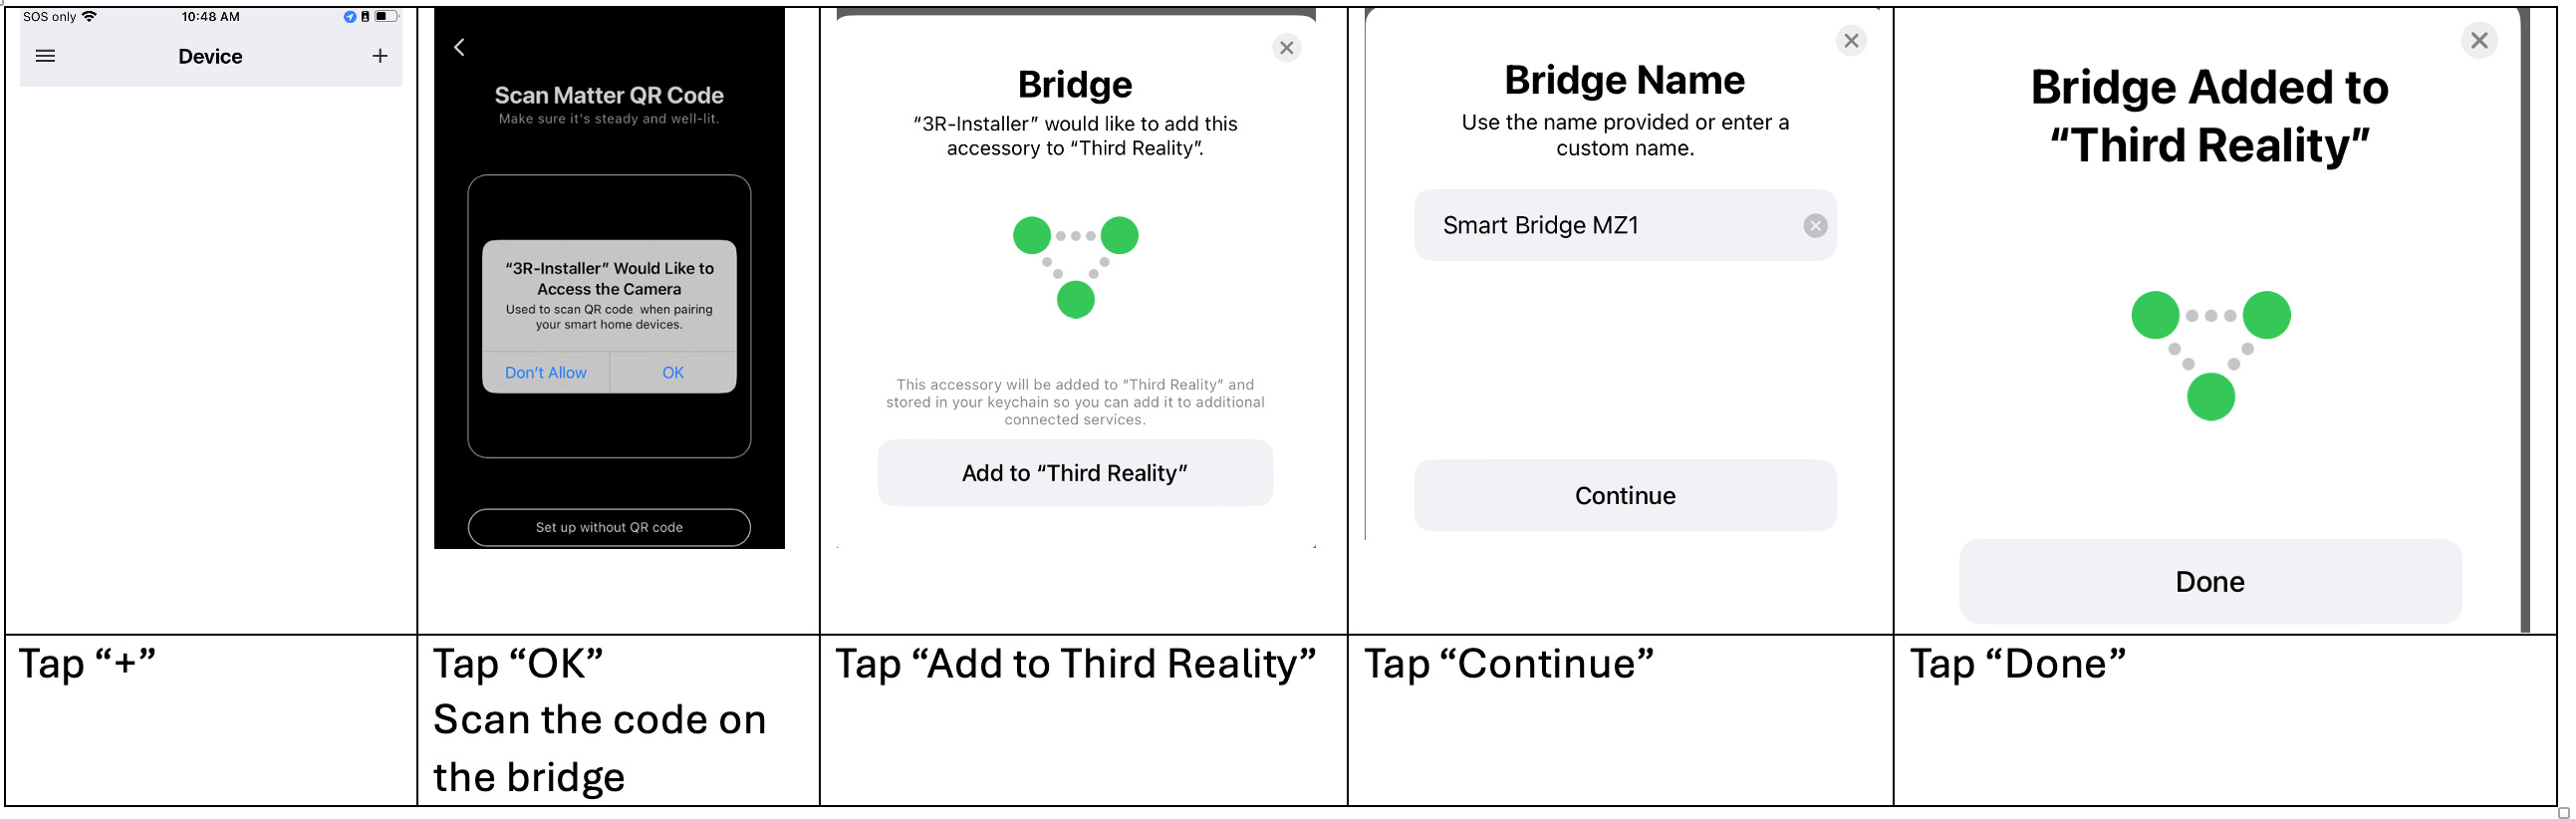
· Insert the batteries in the smart switch and press the button for about 20 seconds until the LED in the switch cover light flashes rapidly.
o This happens about 15 seconds AFTER the solid blue light
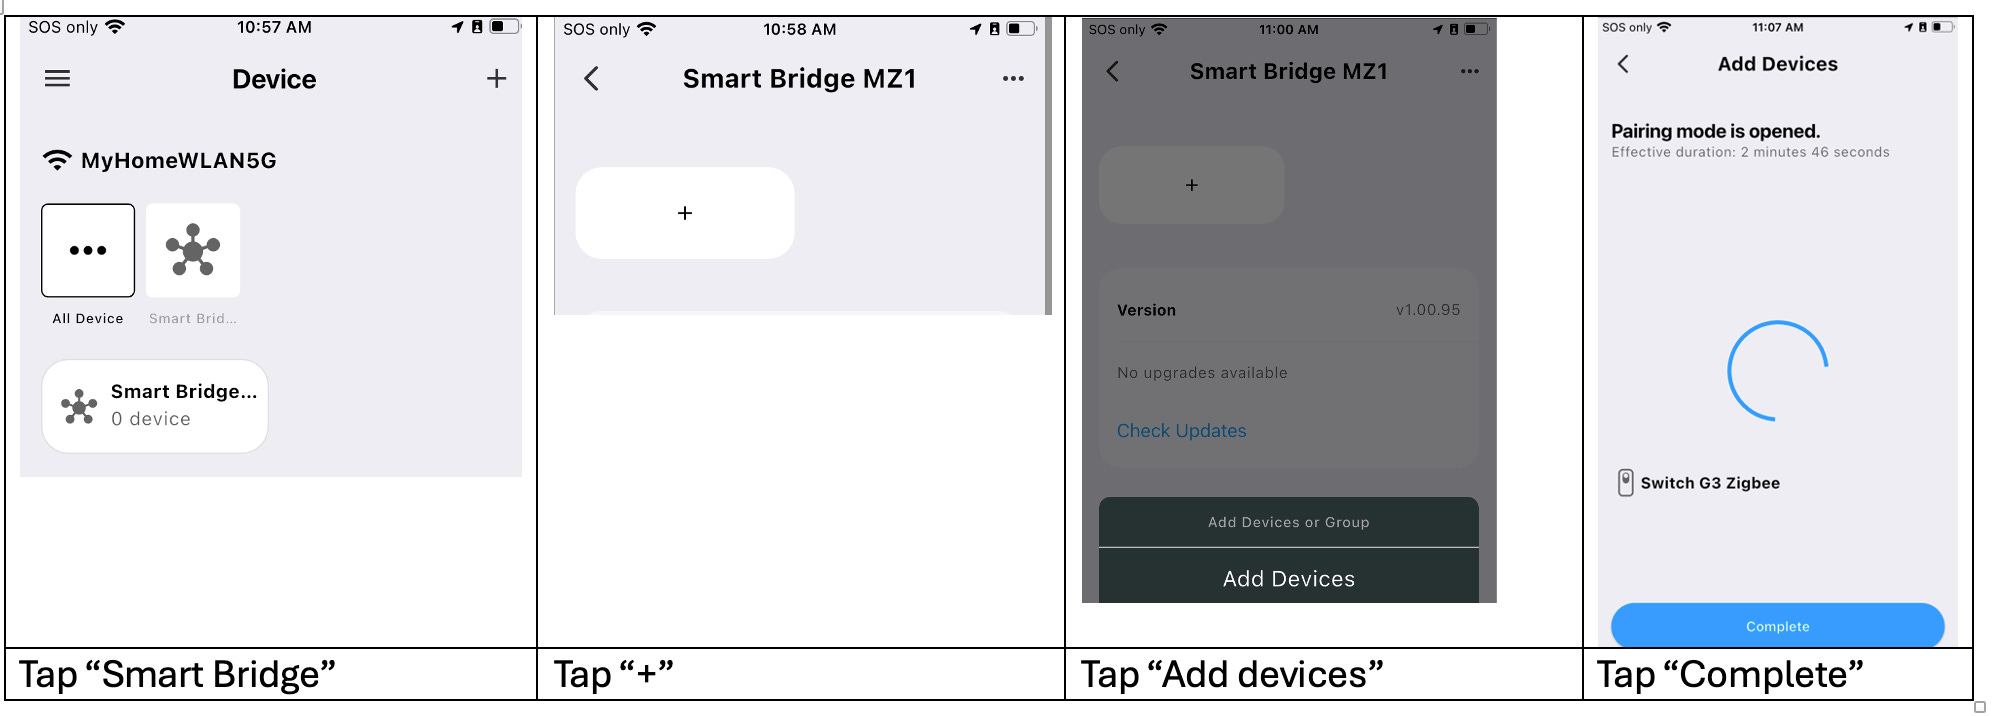
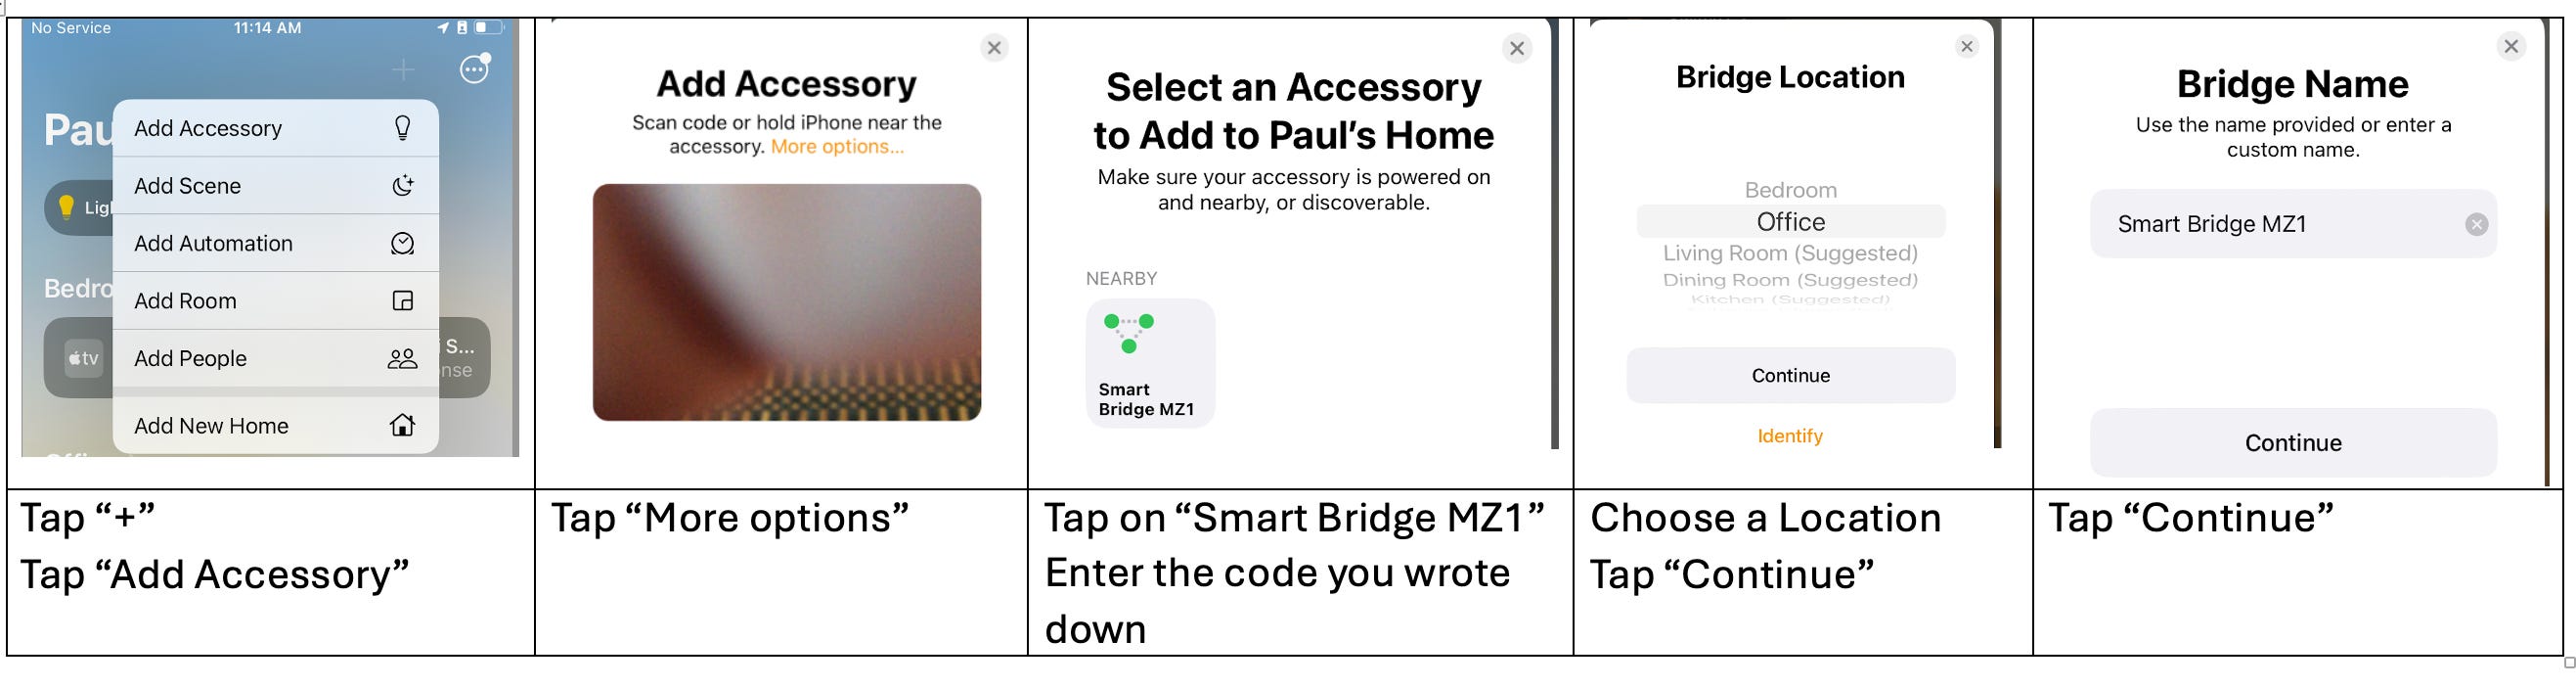
· Open Apple Home App
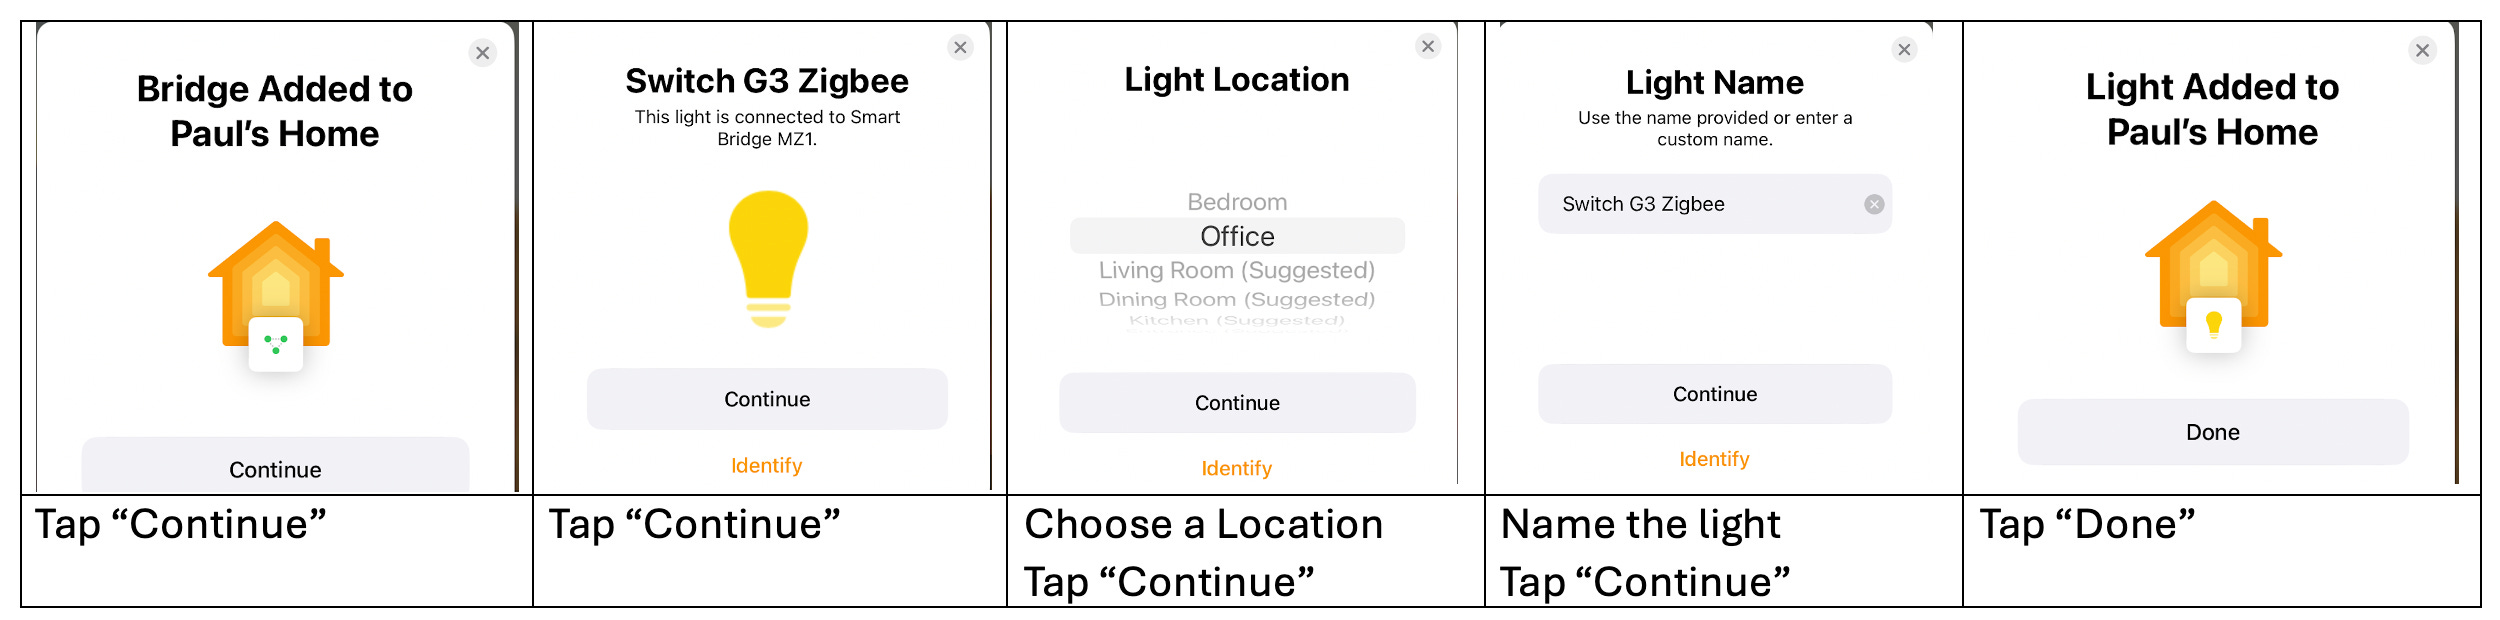
Testing:
You should now be able to turn the switch on/off in the Apple Home app with a tap or by using Siri.
You can also add it to HomeKit Automations, such as a Time-of-Day. In this example, I’m turning on a porch light at sunset
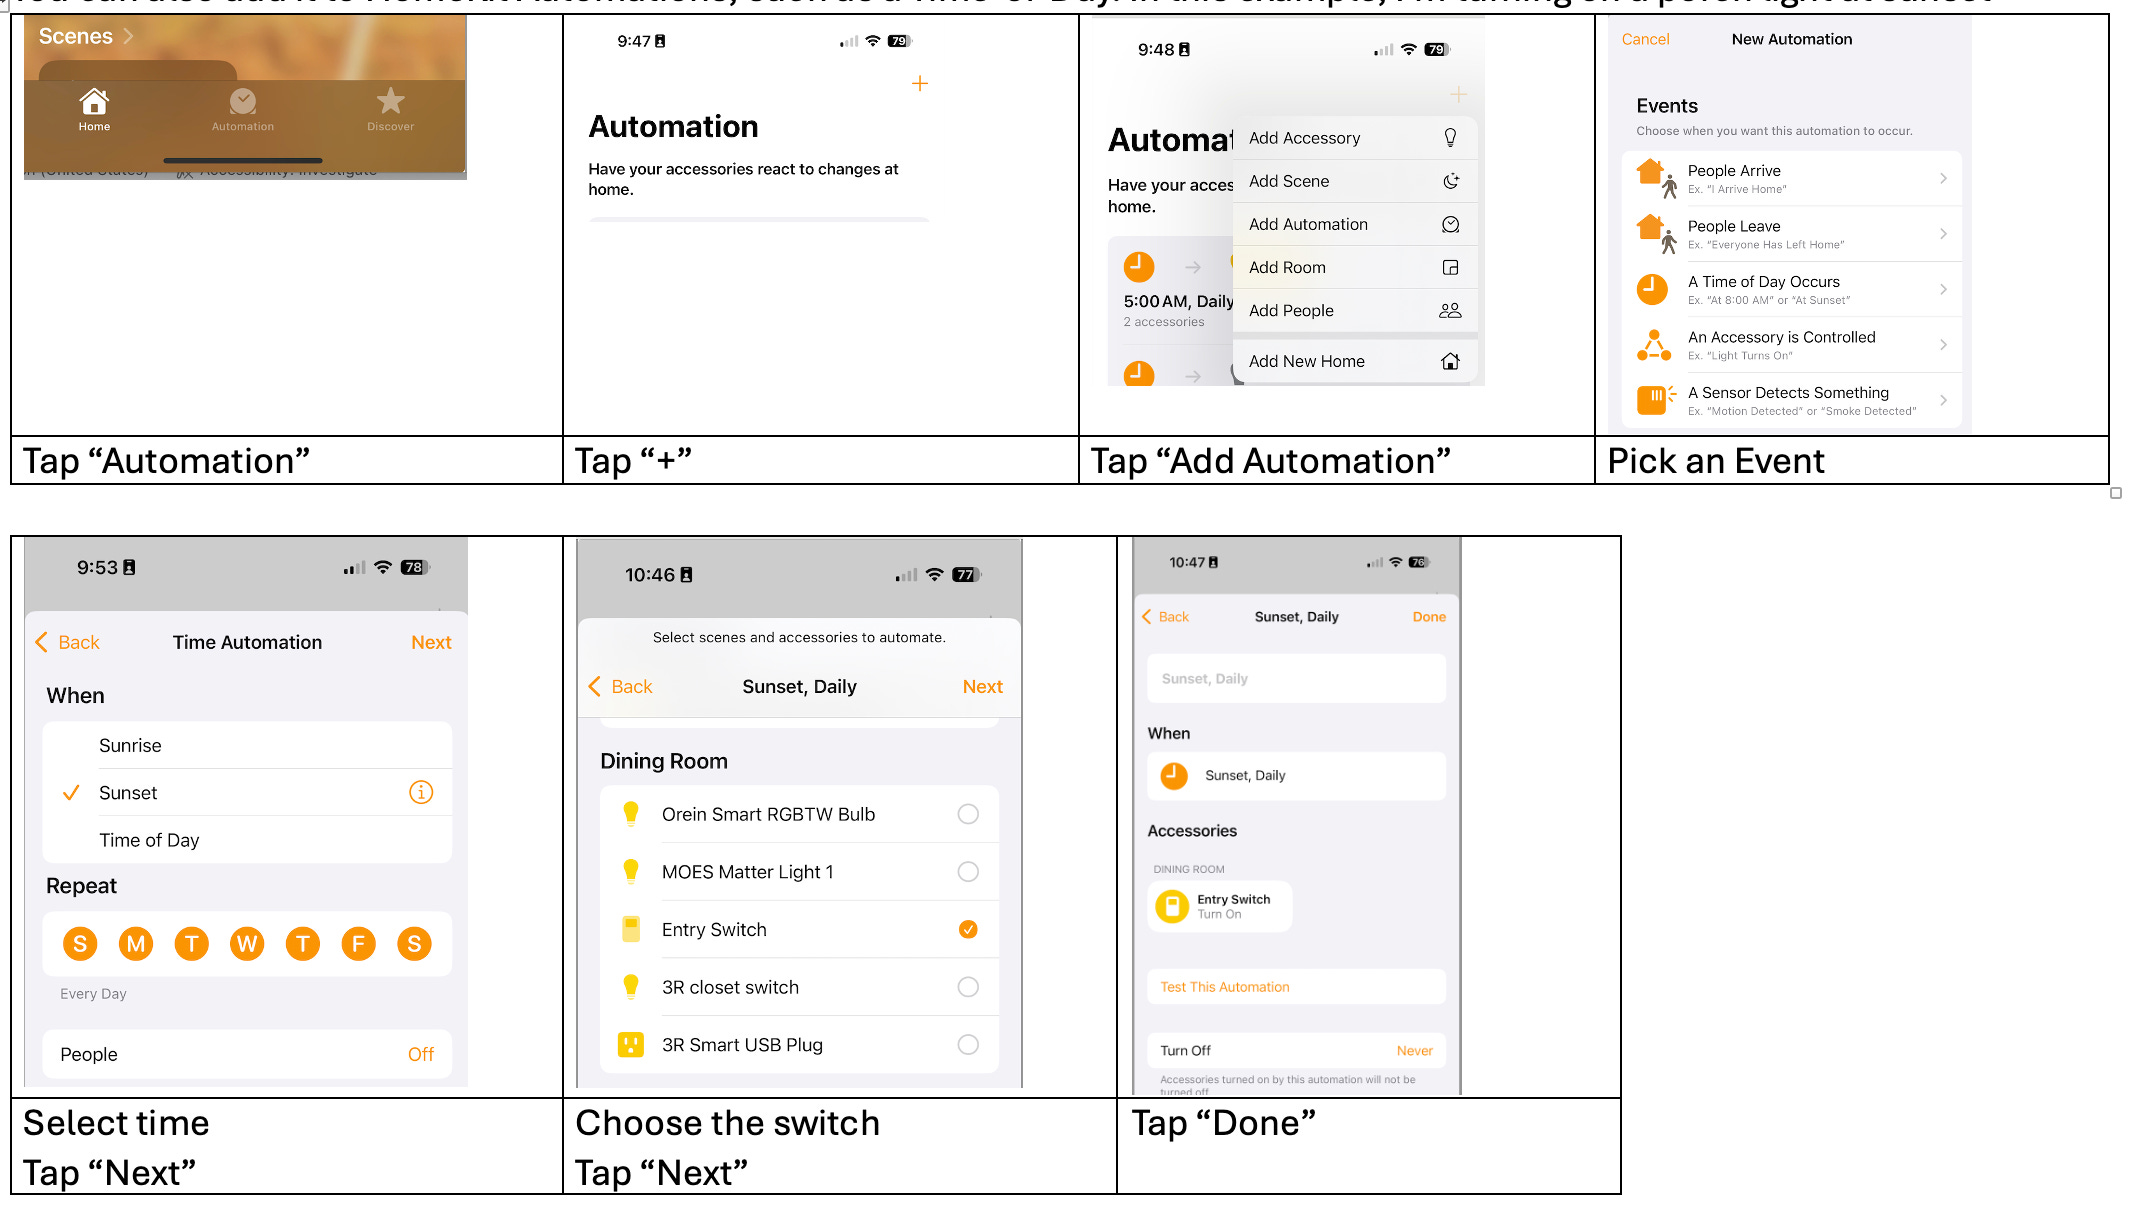
You could create a similar automation to turn it off at sunrise.
Update:
If you are experiencing problems with the switch, you may need to update the firmware using the Third Reality “3R-Installer” app instructions.
You must put the switch into Reset Mode by holding the button for about 20 seconds until the LED flashes rapidly. This happens about 15 seconds AFTER the LED turns solid blue.
Note: After you update the firmware, you must put the switch in Reset Mode to add the switch back into Apple Home.
Bonus:
Another benefit of Thread-based devices is that they use “local control” and operate even if your Wi-Fi or Internet is down. A HomePod or an iPhone can control them if it’s one of these models:
· iPhone 16 (except “e”)
· iPhone 15 Pro
This is a pretty cool and useful product, and the setup and installation look fairly easy for almost anyone. That is important. Nice find and excellent writeup of a product that could be used by almost any Apple user. I'm sure it's fine for Android, too, though.
Note: Since the Matter Code sticker is NOT attached to the switch, you will need to retain it, or a picture of it, as it will be REQUIRED if you delete the switch from HomeKit or the 3R-Installed app and then attempt to reconnect it. If you have several of these switches, please be aware that this is a unique ID for each switch.
Some readers store the Matter setup codes in Apple Notes or use apps such as Controller or HomePass to manage the setup codes